I started off so well with this column. I wrote two in the first month. Now, here I sit, nearly four months since my last piece, trying to figure out if I’m getting senile or if I’m just lazy. In reality, it’s neither.
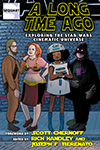
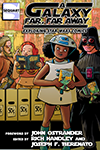
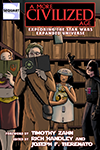
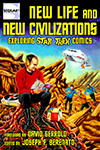
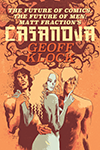
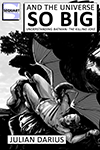
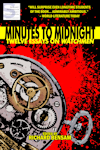
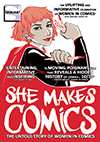
I’ve spent a while working on new and interesting projects), some film work, and my far-from-finished graphic novel. I’ve also completed work on two covers for Sequart.com’s very own book line, and that’s what I’m going to talk about today. Aren’t you so damn lucky?
would need extra icing. He agreed and said if I delivered it on time there may be a small monetary bonus, but that it would more likely be smaller, less labor-intensive baked goods. In the comic industry, that’s actually a pretty good deal (I’ve also gotten paid in pastries for doing cartoon voice-overs. That’s what I get for being non-union.)
After much procrastination, and a trip to WizardWorld Philly to harass unsuspecting colleagues alongside Mike Phillips (Fig. 3126) and Robert Emmons (Fig. 325), I was ready to take on the task.
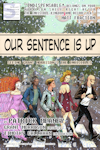
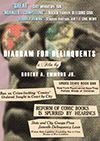
The process was fairly straightforward. Julian sent over a concept description, which I immediately threw into the garbage. After realizing that I couldn’t come up with a better concept (Fig. 86), or any concept at all for that matter, I fished the description out from under the dead bugs in the trash and started to work. Here’s what my first sketch looked like:
It wasn’t my best work, but it was solid. We just had to beat it into shape. I scanned the piece and emailed it to Julian, he sent me some notes, and the work began to evolve.
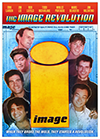
It evolved into this:
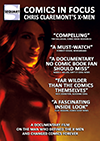
Then to this:
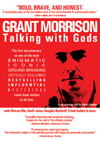
And this:
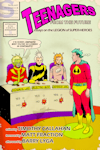
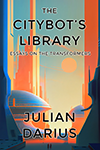
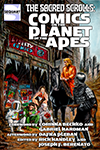
Before finally settling into this:
So now we had a workable plan. I had my rough in front of me and now had to figure out how to make it less rough. Meaning tighter. Which is the opposite of rough. Wait, no it isn’t. Anyway, I added a border in Photoshop that was more proportionate (to say the least) than the one on the rough. I printed the rough out from my computer in a very light cyan blue on an 8.5 x 11 sheet of toothy 2-ply Bristol board. I like using 2-ply Bristol because I can feel the table beneath paper when I draw, and because it rolls up underneath my hand when I sweat.
I then penciled the piece using a mechanical pencil with 2H lead and a regular #2 HB yellow pencil. I find the #2 pencil works best with the barrel chewed nearly down to the graphite and the eraser gnawed off and swallowed. It also helps to accidentally turn the pencil around and gouge your work at least once per hour.
After pencils come inks, which are my favorite part of the process. I use Speedball Super Black for my brush work and Higgins Black Magic for nib work. And I do love my nibs. I use a Hunt 102 and a 107, as well as a Deleter G-Pen. The brush I usually favor is a Raphael Kolinsky Sable #3 (orange tip), but for more slickness and control, on this piece I used a #1. It’s always good to keep a variety of tools handy just in case the aliens invade and the only thing standing between you and total annihilation is the ability to ink Archie-style. Yup, I’ve got issues.
I also use the old standby Staedtler Microns, size .03, .05 and .08. For white, I use a beat up old #1 crap brush and a tube of white acrylic paint. I also keep a tooth brush on hand to splatter and one or two Koh-I-Noor Rapidographs around for shits and giggles. Circle templates, French curves, ellipse templates and a giant triangle are always nearby, mostly collecting dust.
Now that I’ve told you all of that, I used the #1 on all the figures and microns for the background. Yes, I just wasted two paragraphs.
Once that was all done, it was on to the coloring. I hate coloring. A lot. I think it stems from when I was a child and my dog was killed by a Sherwin Williams truck. Either way, I find it hard to apply realistic color to a cartoon drawing. That is why god created Photoshop.
I have a cute l’il Mac Mini that I use for work, and it suits me great. In conjunction with the latest Photoshop and my Wacom Intuos 2 tablet, it’s just like drawing on paper, only you can undo your mistakes. I also calibrate my monitor every few months, which is imperative if you’re working for print. You need to create settings relative to what you see so that your greens don’t turn out orange and your yellows don’t turn out purple. Which is impossible really, but I’ve seen some really dumb shit happen.
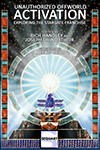
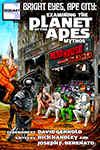
In the coloring phase, I used the flatting method, which others have detailed elsewhere, so I’ll spare you most of the technical details. After that, I modeled all of the figures by hand, using a tri-tone system, and I used flat tones and the dodge tool on the background. The “inks” for the posters were created by digitally inking over the actual movie posters, and the fire effects were created using a little outer glow action.
Some adjusting of layer settings and a screen layer of yellow over the whole thing, and it’s good to go.
So there you have it. It goes without saying that in between each of these stages, I emailed a jpeg to Julian for approval. And I eventually received extra cookies in the mail. I have it from my sources that the book will be out in October, so order one from your local comic shop. And be sure to join me next time when I examine the thematic structure of “Flashdance” and how it relates to the comic industry. Sad thing is, I’m not even sure I’m kidding.